
Find The Needle factory layout for the first yard
Lay out a Find The Needle yard that survives five stages: one spine, a scan gate, a Depot pocket for truck parts, a service aisle and a marked shed wall.
Written for the Early Access build at patch V15.4 (November 9, 2026). Machine sizes and unlock order have changed since the demo, so an old demo layout will not transplant cleanly.
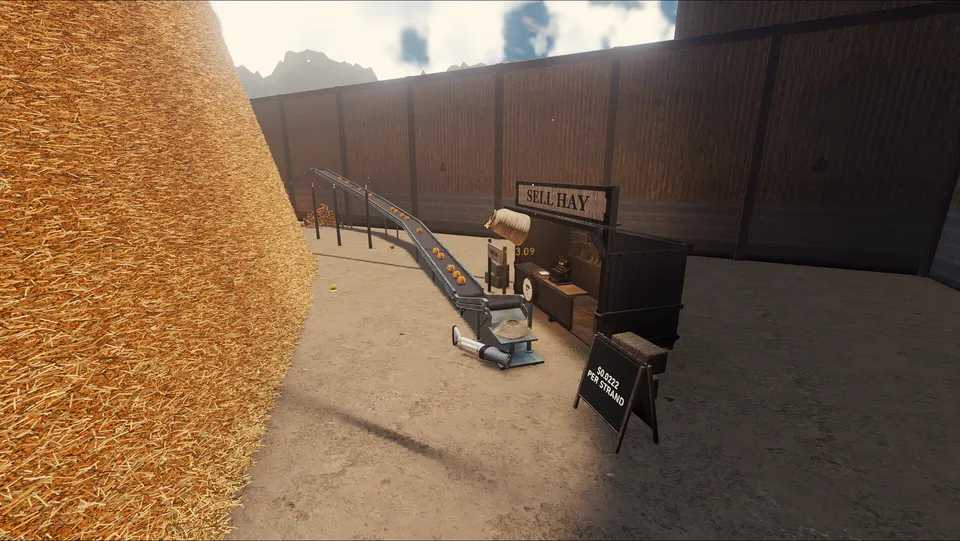
How should the first factory be laid out?
Pick the stand end first, run one straight belt from the pile face through a scanner to it, and keep the service side of the yard empty. Then bolt on the four things Early Access adds: a Depot pocket near the truck, a smelter corner where scrap can be sorted, a water riser for the machines that need it, and a blueprint pad large enough to copy the line you just built.
The point of the shape is still repair: a yard with one spine has one place to look when product stops arriving.
The zones of a first yard
| Zone | What goes there | Why it sits there |
|---|---|---|
| Pile face | Arms, rakes, excavator, anything that touches hay | The only zone that moves as the pile shrinks |
| Spine | One belt run toward the stand | One repair point, one direction |
| Gate | Scanner, after the last packaging step | A gate only works if the product must pass it |
| Depot pocket | Depot and its drone landing space | The truck and the shop stop pulling from one belt |
| Service aisle | Poles, pipes, cables, the walk you actually use | E on a pole kills the whole network; keep it visible |
| Copy pad | Blueprint Designer space near the spine | The second line should be a copy, not a rebuild |
Loose hay still gets dug by hand early, with the metal detector and the tools in the tools index. That needs a short walk to the stand, not a zone.
Build the line backwards
- Set the stand end. Leave the floor in front of the Selling Stand empty; the inbound belt snaps to the port you look at.
- Pick one collection point. Not one per arm. One place where hay enters the spine.
- Lay the straight run. Press F only for the corner automatic snap keeps getting wrong, then press it again (controls).
- Insert the gate before you need it. A scanner on the spine between packaging and the stand costs the same space now and saves a rebuild later (scanner routing).
- Leave the Depot pocket. The tutorial gives you a Depot Drone at the Straw Panels order, and it needs a Depot with stock and a clear flight to the lorry (Depot and drones).
- Plan one vertical run. Even a single Hay Lift between two floors saves a long belt later (lifts and vertical builds).
- Walk it once. Follow a load from collection point to stand and watch it enter.
Put metal on its own lane
Scrap arrives with the hay. Sorting it after the fact is what jams hay machines, so give metal a route from the start: a smart splitter with a Scrap door feeding the Smelter, and a generator that burns what the Smelter does not want.
If you would rather not deal with it yet, Options has a Scrap jams switch: turn it off and hay machines never jam on scrap, at the cost of the scrap they eat. The full chain is on scrap metal and the Smelter.
Keep power and water in the aisle
Poles along the walkway rather than between machines: E on a pole shuts the whole network down, so the switch you might hit should be the one you can see, and a repair trip should not mean climbing a machine stack.
Water needs its own vertical space. A well pushes water 10 m up, a Pipe Pump Mk.1 adds 20 m and Mk.2 50 m, and machines above the reach report that they are dry and by how much (water and pipes). Put the riser where you can reach the pumps, not behind the press line.
Leave a lane for the pile to shrink
Arms and rakes reach a fixed distance and the pile does not stay put. Walk them closer within the first hours, even when the height looks unchanged. Treat the pile side of the yard as temporary floor and everything permanent as stand-side.
Mind the shed wall
Small signs now mark where the next warehouse wall will go. Building past that line is a demolition you will pay for twice: once to build, once to remove. Extend the Shed is cheap on V15.4 — level 1 is $200 and one straw panel — so the wall moves sooner than you expect.
What to add next, and where
| Next purchase | Where it lands | What it costs if placed badly |
|---|---|---|
| Second arm or rake | Same pile face, same collection point | A second entry splits the spine |
| T Junction ($60) | After the gate, never before it | An ungated branch sells product the gate never saw |
| Panel Press | Between collection and gate | Packaging after the gate re-hides the needle |
| Smelter | Beside the scrap lane, near the generator | Scrap piles up in the aisle and jams hay machines |
| Depot | Beside the truck route | A Depot with no belt after it drops overflow on the floor |
| Blueprint pad | Anywhere flat near the spine | A pad over floor paint cannot be placed at all |
Machine names and roles are in the machines index; the stage order is on production stages; splitter routing is on splitter routes and ratios.
Layouts that cost a rebuild
- A belt that runs past the scanner instead of through it. Proximity is not a scan.
- One enormous loop with no ends. Long loops hide which segment stalled.
- Building over the pile face. The pile retreats and the floor becomes a ceiling.
- Filling the service aisle with storage. You will walk it a hundred times.
- Rebuilding the second line by hand. Lay it once on a Blueprint Designer pad and place copies (blueprints and dismantling).
If the first hour is still ahead, start with the beginner guide. Before building large, read system requirements — big yards are CPU heavy, and V15.4 fixed a belt leak that used to black out machines after an hour or two on them.
Related Articles
guides
Find The Needle blueprints and Dismantle Mode
Save a Find The Needle build on a Blueprint Designer pad, copy it anywhere, and use the Needle Hammer to take it down with the refund shown first.
guides
Find The Needle day, night and lighting
Nights are brighter since V14.1 and Options has a brightness slider, but lamps, flood lights and a Light Sensor still pay for themselves in Find The Needle.
guides
Find The Needle demo versus the full game
The free demo stops at V8 and has no metal, Depot, pipes or blueprints. A straight list of what the Early Access build adds, and what it does not.
Was this helpful?
Thanks for the feedback!